Pages

Showing posts with label Linux. Show all posts

VLANs and 802.1q support on OpenSuse Linux

This week, a friend looked at me as I could do to solve a problem with a Linux server with a single network card and wanted to configure squid, dns, dhcp and apache. The problem is that before I had done with a server with two network interfaces.

Well here is a possible solution to this problem, mainly because his work has a managed switch and can make use of this resource. With this, the configuration will be conducting a linux server with support for VLANs and specifically support IEEE 802.1q protocol.

The graph below shows the traditional pattern they had before the server is damaged. With a public interface and one connected to the private network.
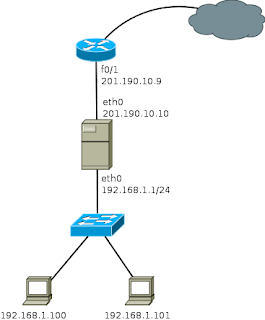
Traditional proxy on a network

Note: The IP address 201.190.10.9 is invented.

In this scheme, all computers could connect to the Internet through this proxy server.

Now we see the same process to set up a server that has a single network card. For this, you must configure a couple VLANs on the switch (as an example I use a Cisco 2960) although this can be done with any switch that has vlan support.

Switch>enable
Switch#
Switch#configure terminal
Enter configuration commands, one per line.  End with CNTL/Z.

Creating VLANs 10 and 20 (VLAN 10 is used for the network that connects to the Internet and VLAN 20 to the local network)

Switch(config)#vlan 20
Switch(config-vlan)#name internet
Switch(config-vlan)#end

Switch(config)#vlan 10
Switch(config-vlan)#name local-network
Switch(config-vlan)#end

You also need to configure a port as a trunk, wherein the card that has the Linux server will connect.

Switch(config)#interface fastethernet0/1
Switch(config-if)#switchport access vlan 20 (This port connects the wire coming from Internet)

Switch(config)#interface fastethernet0/24
Switch(config-if)#switchport mode trunk
Switch(config)#do write

Well this is all there is to do in the Cisco 2960, now only need perform configurations on the Linux server, in case I will use a computer with OpenSuse 11.3.
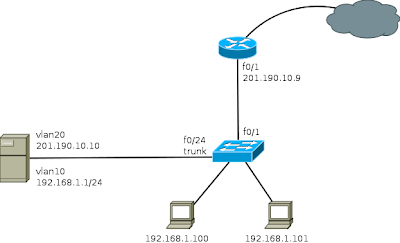
Proxy on a network with VLANs

The first thing to do is to install the package "vlan - 802.1q VLAN Implementation for Linux"

Then you can run the following commands:

# Creating the vlan
vconfig add eth0 20
vconfig add eth0 10

# Assigning IP to VLANs
ifconfig eth0.20 201.190.10.10 netmask 255.255.255.0
ifconfig eth0.10 192.168.1.1 netmask 255.255.255.0

As mentioned earlier, it is essential that the port where the server is connected, it is set to port truncal (trunk) on the switch. If the switch does not automatically add the VLANs on the trunk port, you must specify the VLAN 20 and VLAN 10 are allowed on the port.

The other way to set this is the creation of ifcg-vlan10 and ifcg-VLAN20 files with the following content:

ifcg-vlan10 file
----------------------------------
BOOTPROTO='static'
BROADCAST=''
ETHERDEVICE='eth0'
ETHTOOL_OPTIONS=''
IPADDR='192.168.1.1/24'
MTU=''
NAME=''
NETWORK=''
REMOTE_IPADDR=''
STARTMODE='auto'
USERCONTROL='no'
PREFIXLEN='24'


ifcg-vlan20 file
----------------------------------
BOOTPROTO='static'
BROADCAST=''
ETHERDEVICE='eth0'
ETHTOOL_OPTIONS=''
IPADDR='201.190.10.10/24'
MTU=''
NAME=''
NETWORK=''
REMOTE_IPADDR=''
STARTMODE='auto'
USERCONTROL='no'
PREFIXLEN='24'

Once configured, it is necessary to perform a reset of the network with /etc/init.d/network restart command

After completing these steps, running the ifconfig command, network interfaces created appear and can be used in the same manner as in a server with two network interfaces. That is, the steps to configure squid, dns, dhcp, etc, is done in the same manner as in the traditional scheme.

Read more

Configuring a DHCP server on Linux

DHCP (Dynamic Host Configuration Protocol) is a network protocol that allows customers to get their network settings automatically. In this case, I will explain how to configure a small DHCP server for a small network, assigned by a range.

The first thing to do is make a copy of the original file of DHCP, to ensure that we always have a copy of the original file as a backup.

linux# cp /etc/dhcpd.conf /etc/dhcpd.conf.original

For the DHCP service is running, you must specify the network interfaces in which the service is running. For this, you must edit the /etc/sysconfig/dhcpd file.

linux# vi /etc/sysconfig/dhcpd

## Path:        Network/DHCP/DHCP server
## Description: DHCP server settings
## Type:        string
## Default:     ""
## ServiceRestart: dhcpd
#
# Interface(s) for the DHCP server to listen on.
#
# Instead of the interface name, the name of its configuration can be given.
# If the configuration file is named
#    /etc/sysconfig/network/ifcfg-eth-id-00:50:fc:e4:f2:65
# then id-00:50:fc:e4:f2:65 would be suitable to identify the configuration.
#
# Examples: DHCPD_INTERFACE="eth0"
#           DHCPD_INTERFACE="eth0 eth1 eth2 tr0 wlan0"
#           DHCPD_INTERFACE="internal0 internal1"
#           DHCPD_INTERFACE="id-00:50:fc:e4:f2:65 id-00:a0:24:cb:cc:5c wlan0"
#
DHCP_INTERFACE="eth0"

In the "DHCP_INTERFACE" label should specify the interfaces that will be used to provide the service.


The configuration file "dhcpd.conf"


The DHCP is basically divided into two sections. The first is the general options and are global. The second and last define the network segment where the DHCP will reside. There may be more than one section of this type. The parameters here writings are more global preference.


authoritative;

This statement allows you to define the DHCP server is authoritative for the defined network segment and can send warning messages to misconfigured clients.


default-lease-time 21600;

This standard defines how many seconds will "rent" an IP address to a computer that request before it has to request an extension


max-lease-time 43200;

Defines the maximum time that a device can retain an IP number assigned by the DHCP server without applying for it an extension (max-lease-time).


ddns-update-style none;

This parameter controls whether the server will attempt, or not, make a DNS update when a loan is confirmed.


subnet ……… netmask ………

Defines a network with subnet mask


range

Select the address range used by the DHCP daemon to assign IP addresses to clients who consult. For this example, are all the addresses between 172.16.3.2 and 172.16.3.10


option domain-name-servers dns1.intranet.labtest;

Enter up to three DNS servers. These are responsible for resolving IP addresses to hostnames (and vice versa).


option domain-name "intranet.labtest";

Defines the default domain of your network


option routers 172.16.3.1;

Defines where to be sent data packets that can not be delivered to the local network (due to the direction of the source host and the destination host and the subnet mask). This router usually acts as the gateway to the Internet for small networks.


option subset-mask 255.255.255.0;

Provides customer network mask to deliver.


Below is an example configuration file: /etc/dhcpd.conf

linux# vi /etc/dhcpd.conf

#
# Section Global parameters
#

authoritative;
default-lease-time 21600;
max-lease-time 43200;
ddns-update-style none;

#
# Section Network Configuration
#

subnet 172.16.3.0 netmask 255.255.255.0 {
 range 172.16.3.2 172.16.3.16;
 option domain-name-servers dns1.intranet.labtest;
 option domain-name "intranet.labtest";
 option routers 172.16.3.1;
 option subset-mask 255.255.255.0;
}

After this brief setup, you should be able to activate the DHCP daemon with the command rcdhcpd start or /etc/init.d/dhcpd start

It is also possible to control the syntax of the configuration using the "rcdhcpd check-syntax" command. If there is a problem and the server gives an error check with "tail-f /var/log/messages".

Read more

Basic Network Configuration in Linux

Many Linux distributions now have tools to configure the basic settings for the network connection through graphical interfaces, however, sometimes it is easier to do this task by commands. I leave the series of commands that need to change ip in Linux using the shell (or console or command line).

The ifconfig command to define network settings for different devices, for example in the case of the eth0 and eth1 interfaces are the following commands, as you can see there are several ways to configure the same.

For example:

ifconfig eth0 192.168.1.10 netmask 255.255.255.0 or ifconfig eth0 192.168.1.10/24

if you have a second network card, the command would be:

ifconfig eth1 192.168.2.10 netmask 255.255.255.0 or ifconfig eth1 192.168.2.10/24

This allows us to establish a connection to any computer that is within the networks directly connected to the computer. To access a network different from ours, we need to configure a default route (assuming that the IP address 192.168.1.1 belongs to a device that is responsible for keeping our traffic to other networks)

route add default gw 192.168.1.1

Finally, we need to configure at least one primary DNS server that is responsible for making translations of URLs to IP addresses. For this you can edit the /etc/resolv.conf file or use something like the echo command:

echo nameserver 192.168.1.200 > /etc/resolv.conf

Finally, you must restart the network service and ready. To mention, the command can be: service network restart or /etc/init.d/network restart (on some distributions is /etc/init.d/networking restart)

Read more

Configuration of iptables - Firewall in Linux

What is a firewall?

The first thing to consider when setting up a firewall, is whether it is really necessary, many people today are connected to the Internet in one way or another, from businesses, homes or from a cybercafe, however, few of these people really understand the consequences of opening their computer systems to the Internet.

A firewall is typically a software or hardware, through which we connect to a network such as the Internet, and serves as a filter over the traffic that passes through it in both directions, and that at a given moment can reject some traffic in one of the directions.

Simple Firewall

That means that a firewall, we can detect unwanted traffic to our systems, and in general, possible attacks that we object. In this way, we can isolate our external network devices, allowing our use of the Internet so absolutely normal while minimizing as far as possible the probability of suffering the consequences of an attack.

It is also often needed to expose some Internet server (such as a web server, a mail server, etc ...), and in those cases in principle obviously must accept any connection to them.

Complex Firewall

Iptables (Free Software)

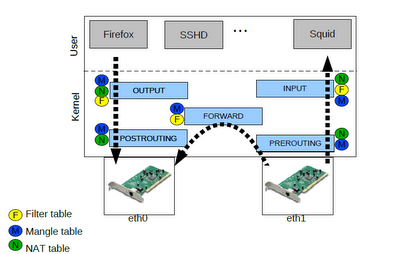
Iptables is the tool that allows us to set the rules of packet filtering system of the Linux kernel since version 2.4 (in 2.2 was ipchains). With this tool, we can create our firewall tailored to our needs.

Iptables Kernel Linux
The operation is simple: to provide you iptables rules, each specifying certain characteristics expected of a package. In addition, this rule is specified for an action or target. The rules have an order, and when it receives or sends a packet, the rules are traversed in order until the conditions he met one of them in the package, and the rule is triggered by performing the action that has been specified.

These actions are reflected in what are called targets, indicating what to do with the packet. The most used are quite explicit: ACCEPT, DROP and REJECT. As for the packet, the total packet filtering system kernel is divided into three tables, each with several chains which may belong to a packet, as follows.

*FILTER: Default table, for packages that relate to our machine

INPUT: packets received for our system
FORWARD: Packets routed through our system
OUTPUT: Packets generated in our system and are sent

Iptables Tables

*NAT: Table refers to routed packets on a system with Masquerading

PREROUTING: To alter packets as they enter
OUTPUT: For altering locally generated packets before being routed
POSTROUTING: To alter packets as they are about to exit

*MANGLE: To make special changes to packages more.

PREROUTING: To alter the incoming packets before being routed
OUTPUT: For altering locally generated packets before routing

Specification of rules

Is done with the following parameters (specifying those needed):

*-p [protocol]: protocol to which the packet belongs.
*-s [Origin]: packet source address can be a host name, a normal IP address, or a network address (with mask, so address / mask).
*-d [destination]: Like the above, it can be a host name, network address or unique IP address.
*-i [interface-entry]: Specifying the interface through which the packet is received.
*-o [O Interface]: Interface for which you will send the package.
*[!]-F: Specifies that the rule refers to second and further fragments of a fragmented packet. If preempts!, Refers only to the first package, or unfragmented packets.

And also, one that will allow us to choose what we do with the package:

*-j [target]: Allows you to choose the target to which to send the packet, that is, the action to perform with him.

Before starting with the example of firewall rules is important to recognize that the order of the rules is crucial. Normally when deciding which is made with a package will compare with each firewall rule until it finds one that is affected (match), and becomes the dictates this rule (Accept or Deny), ie once a packet matches a rule not analyzed as follows.

Firewall - Topology


Example iptables rules, Initialize

Set default policies, important to define in principle that everything that enters and exits through the firewall only accept and deny what is said explicitly. This greatly facilitates the management of the firewall, and we just have to worry about protecting those ports or addresses that we know we are interested. However this can be dangerous.

echo 1 > /proc/sys/net/ipv4/ip_forward

iptables -X
iptables -F
iptables -Z
iptables -t nat -F

iptables -P INPUT ACCEPT
iptables -P OUTPUT ACCEPT
iptables -P FORWARD ACCEPT
iptables -t nat -P PREROUTING ACCEPT
#iptables -t nat -P FORWARD ACCEPT
iptables -t nat -P POSTROUTING ACCEPT

Establish policies to deny access to ssh on interfaces eth0 and 192.168.1.0 network, allowing full access to the network from the network address 172.16.2.0 and 172.16.20.0; also permit 172.16.10.0 network users, can Internet access

Example of rules for the filter table

iptables -A INPUT -i eth0 -p tcp --dport 22 -j DROP
iptables -A INPUT -s 192.168.1.0/24 -p tcp --dport 22 -j DROP
#
iptables -A INPUT -s 172.16.2.0/24 -j ACCEPT
iptables -A INPUT -s 172.16.20.0/24 -j ACCEPT
iptables -A FORWARD -s 192.168.10.0/24 -i eth1 -p tcp --dport 80 -j ACCEPT

Through this rule is indicating that all traffic from the 192.168.1.0 network, will be masked by the IP address of the network card eth0 (172.16.2.13, for this example)

Example of rules for the NAT table

iptables -t nat -A POSTROUTING -s 192.168.1.0/24 -o eth0 -j MASQUERADE

Note: If the router does not have a configured NAT rule that says make the network 172.16.10.0, it will be essential to establish a rule like this, but this hid the traffic that comes from this network.

iptables -t nat -A POSTROUTING -s 172.16.10.0/24 -o eth0 -j MASQUERADE

This is a small example of iptables, but iptables is a very powerful tool and is useful to perform an unlimited number of restrictions as needed, some prefer early iptables setup a much stronger, initializing the DROP rules, this will require more knowledge by the network administrator.

Read more

How to show CPU information in Linux - Number of CPUs, speed ...

Have you ever had the need to see the features of your processor under Linux environment and have not found a way to do it, well, in the Linux file system directory find proc (/proc) which is a pseudo-system files used as an interface to kernel data structures or core system.

How to show CPU information

For information on our CPU is needed to use the cpuinfo file that is under the proc directory (/proc/cpuinfo). This file contains information such as CPU manufacturer, family, model, model name easily identifiable by its trade name, clock speed, cache size, core, flags, among other information.

To view the information referred to simply run the following command:

$ less /proc/cpuinfo

And we will show some information similar to the following (not necessarily equal to that of your computer).

processor       : 0
vendor_id       : GenuineIntel
cpu family      : 15
model           : 6
model name      : Intel(R) Pentium(R) D CPU 3.60GHz
stepping        : 4
cpu MHz         : 3590.908
cache size      : 2048 KB
physical id     : 0
siblings        : 2
core id         : 0
cpu cores       : 2
apicid          : 0
initial apicid  : 0
fpu             : yes
fpu_exception   : yes
cpuid level     : 6
wp              : yes
flags           : fpu vme de pse tsc msr pae mce cx8 apic sep mtrr pge mca cmov pat pse36 clflush dts acpi mmx fxsr sse sse2 ss ht tm pbe syscall nx lm constant_tsc pebs bts nopl pni dtes64 monitor ds_cpl vmx est cid cx16 xtpr pdcm lahf_lm tpr_shadow
bogomips        : 7181.81
clflush size    : 64
cache_alignment : 128
address sizes   : 36 bits physical, 48 bits virtual
power management:

processor       : 1
vendor_id       : GenuineIntel
cpu family      : 15
model           : 6
model name      : Intel(R) Pentium(R) D CPU 3.60GHz
stepping        : 4
cpu MHz         : 3590.908
cache size      : 2048 KB
physical id     : 0
siblings        : 2
core id         : 1
cpu cores       : 2
apicid          : 1
initial apicid  : 1
fpu             : yes
fpu_exception   : yes
cpuid level     : 6
wp              : yes
flags           : fpu vme de pse tsc msr pae mce cx8 apic sep mtrr pge mca cmov pat pse36 clflush dts acpi mmx fxsr sse sse2 ss ht tm pbe syscall nx lm constant_tsc pebs bts nopl pni dtes64 monitor ds_cpl vmx est cid cx16 xtpr pdcm lahf_lm tpr_shadow
bogomips        : 7182.31
clflush size    : 64
cache_alignment : 128
address sizes   : 36 bits physical, 48 bits virtual
power management:

Read more

Linux DHCP server for multiple VLANs

The Dynamic Host Configuration Protocol server, DHCP is a protocol that allows individual devices on a network to get their own network configuration information such as IP address, subnet mask, gateway, DNS servers, etc. . The main purpose is to make it easier to manage large networks.

Without the help of a DHCP server would have to manually set each IP address of each computer on the network. A DHCP server monitors and distributes IP addresses in a local area network by assigning an IP address to each computer that is attached to the Local Area Network.

There are three methods of assignment in the DHCP protocol: Manual assignment, automatic assignment and dynamic assignment. In the following example, we analyze two of these cases.

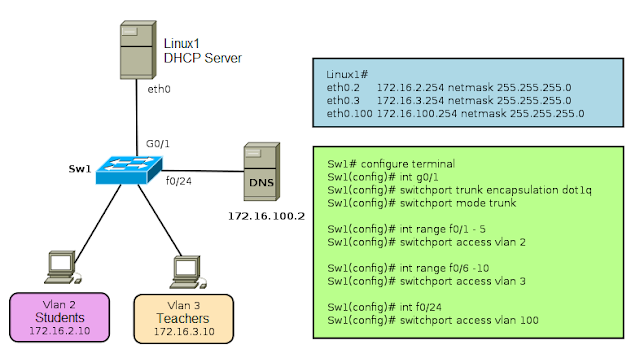
This document explains in simple terms how to configure a Linux server to assign addresses via DHCP to multiple vlans.

VLAN_DHCP_Linux

For the example of the graph, it is considered that a server is configured Linux1 routing packets, that is configured as a router, as well as function as a DHCP server.

In small or medium networks can use the same equipment as DHCP server and as a router, however when the network grows, it is advisable to separate these functions, on different devices. Always remember that the switch port where the DHCP server is connected must be configured as Trunk (IEEE 802.1Q).

In the example also sees a DNS server, it may be a server configured in Linux or Windows, this server belongs to vlan 100 and have configured the IP address 172.16.100.2


VLAN2 Network Data

IP Number VLAN2 network: 172.16.2.0
Subnet Mask: 255.255.255.0
Gateway: 172.16.2.254 (IP Address Interface VLAN2 on the server)
Name Server: 172.16.100.2

VLAN3 Network Data

IP Number VLAN3 network: 172.16.3.0
Subnet Mask: 255.255.255.0
Gateway: 172.16.3.254 (Interface IP Address VLAN3 on the server)
Name Server: 172.16.100.2


Configuration File /etc/dhcpd.conf

# Configuration for the network 172.16.3.0/24
# The 172.16.3.0 network will be configured statically,
# ie always assigned the same IP address to computers.
# ------------------------------------------------------

subnet 172.16.3.0 netmask 255.255.255.0
{
option subnet-mask 255.255.255.0;
option broadcast-address 172.16.3.255;
option domain-name "test.com";
option domain-name-servers 172.16.100.2
option routers 172.16.3.254;

# IP allocation to each PC

host pc01
{
option host-name "pc01.test.com";
hardware ethernet 00:06:AB:AB:01:01;
fixed-address 172.16.3.1;
}

host pc02
{
hardware ethernet 00:06:AB:AB:02:02;
fixed-address 172.16.3.2;
}
}

# Settings for network 172.16.2.0/24

# Network data vlan2 dynamically allocated
subnet 172.16.2.0 netmask 255.255.255.0
{
range 172.16.2.10 172.16.2.20;
option subnet-mask 255.2255.255.0;
option broadcast-address 172.16.2.255;
option domain-name "test.com";
option domain-name-servers 172.16.100.2;
option routers 172.16.2.254;
}

Configuring network interfaces where DHCP service work

A good safety measure is to make the dhcpd service only works through the network interface used by the LAN, that in the case of multiple network devices.

Edit the file /etc/sysconfig/dhcpd and add as parameter argument value DHCPDARGS eth0, eth1, eth2, or in our case eth0.2, eth0.3.

# Command line options here

DHCPDARGS=eth0.2, eth0.3

Note: For example, do not add the interface eth0.100 because normally address assignment on the servers is not done via DHCP.

Then just start the service is dhcp.

/sbin/service dhcpd start or in the case of opensuse /etc/init.d/dhcpd start

Read more

Installing Cacti server (Linux server cacti)

Cacti is an open source tool that allows a network administrator to know the link status, availability of network devices, among other things. This knowledge is important because it allows you to plan, book and manage efficiently the resources of a LAN.
Logo Cacti

Requirements:
  • Distribution: Kubuntu 9.04
  • Software: cacti (hobbit-4.2.0.tar.gz), apache2 (apache2.2.9)
  • Server: netadmin (IP-Addr: 192.168.1.5)

Cacti Server Dependencies

Cacti requires that the following packages are installed on your system.
  • RRDTool 1.0.49 or 1.2.x or greater
  • MySQL 4.1.x or 5.x or greater
  • PHP 4.3.6 or greater, 5.x is recommended
  • Web Server, Apache2 for this manual.

Name required packages
  • httpd
  • php
  • php-mysql
  • php-snmp
  • mysql
  • mysql-server
  • net-snmp

Installing Cacti program

netadmin @linux:~ > apt-get install cacti

Note: During this process, it will install all dependencies that cacti need. (Only debian based operating systems). In Kubuntu, Cacti for a password for the database during this process. So no need to perform subsequent configurations.

Cacti Server Basic Configuration

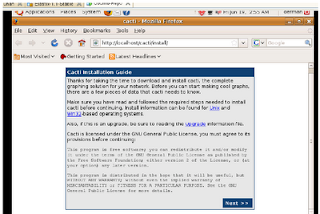
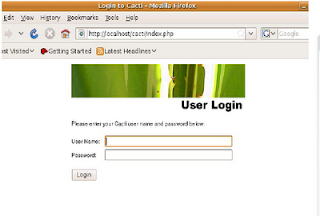
Once completed the installation process of packages, we proceed to the configuration is done through a web browser.
Configure Cacti

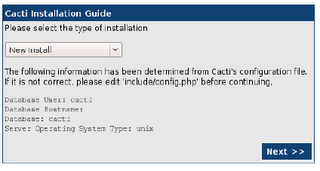
As this is a new installation, you only need to click on next.
Configure Cacti page 2


This section asks the user key administrator for the first time, the User Name is "admin" and password: "admin". Cacti, then request the change of the password for the admin user
Configure Cacti - username

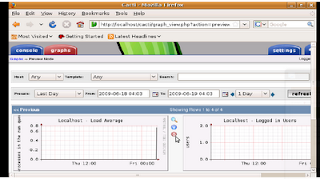
By default, the first time Cacti allows access to the admin account with admin password, then you make this change, you can view images of the home team. Cacti can monitor only the local computer, then you have to configure the control of other computers.
Configure Cacti - admin

Add a new device

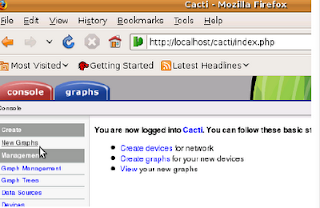
To add a new device (servers, switches or routers) must enter the Console tab and then select the item New Graph.
Configure Cacti - add device

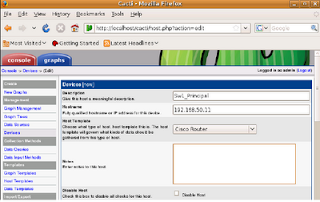
This section introduces the details of equipment, such as IP address, device description (important to identify it) and type of device.
Configure Cacti - detail new device
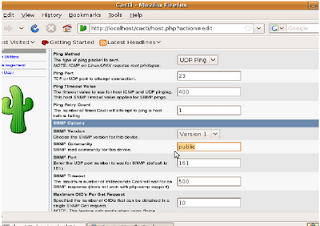
Configure Cacti - detail new device part 2

This is a continuation of the previous screen is used to configure the communication mechanism of Cacti with the device, either through ping or snmp, snmp is best done by, and is also recommended to configure an SNMP community other than public


Creating new graphics on the device
Configure Cacti - new graphics

To add a chart to an existing device, you must enter the Console tab and then select the item New Graph.
Configure Cacti - new chart

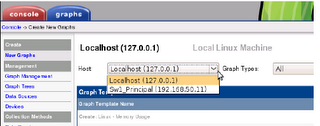
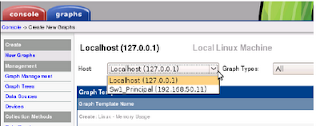
At this stage, Cacti, equipment selection requests which to generate the new graph
Configure Cacti - generate new graph

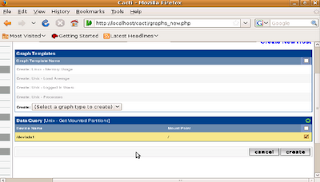
As shown, it is only necessary to perform a check on the new graph needs to be created.

Once you do this, the process is the same for adding new switches and routers. Cacti also allows many other options, however, this will allow you to start working with a very good system to control the bandwidth being used on the network.

Read more