Installing Cacti server (Linux server cacti)
Cacti is an open source tool that allows a network administrator to know the link status, availability of network devices, among other things. This knowledge is important because it allows you to plan, book and manage efficiently the resources of a LAN.

Requirements:
Cacti Server Dependencies
Cacti requires that the following packages are installed on your system.
Name required packages
Installing Cacti program
netadmin @linux:~ > apt-get install cacti
Note: During this process, it will install all dependencies that cacti need. (Only debian based operating systems). In Kubuntu, Cacti for a password for the database during this process. So no need to perform subsequent configurations.
Cacti Server Basic Configuration
Once completed the installation process of packages, we proceed to the configuration is done through a web browser.
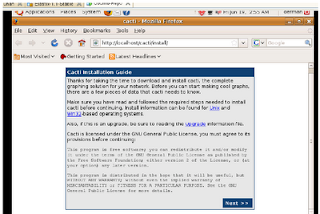
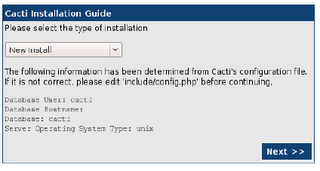
As this is a new installation, you only need to click on next.
This section asks the user key administrator for the first time, the User Name is "admin" and password: "admin". Cacti, then request the change of the password for the admin user
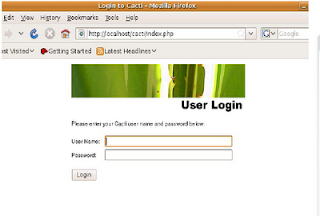
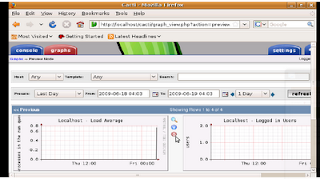
By default, the first time Cacti allows access to the admin account with admin password, then you make this change, you can view images of the home team. Cacti can monitor only the local computer, then you have to configure the control of other computers.
Add a new device
To add a new device (servers, switches or routers) must enter the Console tab and then select the item New Graph.
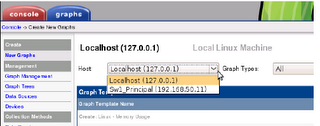
This section introduces the details of equipment, such as IP address, device description (important to identify it) and type of device.

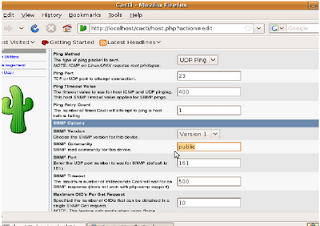
This is a continuation of the previous screen is used to configure the communication mechanism of Cacti with the device, either through ping or snmp, snmp is best done by, and is also recommended to configure an SNMP community other than public
Creating new graphics on the device

To add a chart to an existing device, you must enter the Console tab and then select the item New Graph.
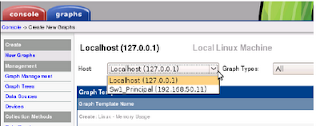
At this stage, Cacti, equipment selection requests which to generate the new graph
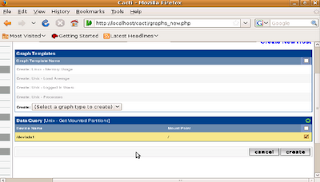
As shown, it is only necessary to perform a check on the new graph needs to be created.
Once you do this, the process is the same for adding new switches and routers. Cacti also allows many other options, however, this will allow you to start working with a very good system to control the bandwidth being used on the network.

Requirements:
- Distribution: Kubuntu 9.04
- Software: cacti (hobbit-4.2.0.tar.gz), apache2 (apache2.2.9)
- Server: netadmin (IP-Addr: 192.168.1.5)
Cacti Server Dependencies
Cacti requires that the following packages are installed on your system.
- RRDTool 1.0.49 or 1.2.x or greater
- MySQL 4.1.x or 5.x or greater
- PHP 4.3.6 or greater, 5.x is recommended
- Web Server, Apache2 for this manual.
Name required packages
- httpd
- php
- php-mysql
- php-snmp
- mysql
- mysql-server
- net-snmp
Installing Cacti program
netadmin @linux:~ > apt-get install cacti
Note: During this process, it will install all dependencies that cacti need. (Only debian based operating systems). In Kubuntu, Cacti for a password for the database during this process. So no need to perform subsequent configurations.
Cacti Server Basic Configuration
Once completed the installation process of packages, we proceed to the configuration is done through a web browser.

As this is a new installation, you only need to click on next.

This section asks the user key administrator for the first time, the User Name is "admin" and password: "admin". Cacti, then request the change of the password for the admin user

By default, the first time Cacti allows access to the admin account with admin password, then you make this change, you can view images of the home team. Cacti can monitor only the local computer, then you have to configure the control of other computers.

Add a new device
To add a new device (servers, switches or routers) must enter the Console tab and then select the item New Graph.

This section introduces the details of equipment, such as IP address, device description (important to identify it) and type of device.


This is a continuation of the previous screen is used to configure the communication mechanism of Cacti with the device, either through ping or snmp, snmp is best done by, and is also recommended to configure an SNMP community other than public
Creating new graphics on the device

To add a chart to an existing device, you must enter the Console tab and then select the item New Graph.

At this stage, Cacti, equipment selection requests which to generate the new graph

As shown, it is only necessary to perform a check on the new graph needs to be created.
Once you do this, the process is the same for adding new switches and routers. Cacti also allows many other options, however, this will allow you to start working with a very good system to control the bandwidth being used on the network.
0 Comments:
Post a Comment