Pages

Showing posts with label Servers. Show all posts

Configuring a DHCP server on Linux

DHCP (Dynamic Host Configuration Protocol) is a network protocol that allows customers to get their network settings automatically. In this case, I will explain how to configure a small DHCP server for a small network, assigned by a range.

The first thing to do is make a copy of the original file of DHCP, to ensure that we always have a copy of the original file as a backup.

linux# cp /etc/dhcpd.conf /etc/dhcpd.conf.original

For the DHCP service is running, you must specify the network interfaces in which the service is running. For this, you must edit the /etc/sysconfig/dhcpd file.

linux# vi /etc/sysconfig/dhcpd

## Path:        Network/DHCP/DHCP server
## Description: DHCP server settings
## Type:        string
## Default:     ""
## ServiceRestart: dhcpd
#
# Interface(s) for the DHCP server to listen on.
#
# Instead of the interface name, the name of its configuration can be given.
# If the configuration file is named
#    /etc/sysconfig/network/ifcfg-eth-id-00:50:fc:e4:f2:65
# then id-00:50:fc:e4:f2:65 would be suitable to identify the configuration.
#
# Examples: DHCPD_INTERFACE="eth0"
#           DHCPD_INTERFACE="eth0 eth1 eth2 tr0 wlan0"
#           DHCPD_INTERFACE="internal0 internal1"
#           DHCPD_INTERFACE="id-00:50:fc:e4:f2:65 id-00:a0:24:cb:cc:5c wlan0"
#
DHCP_INTERFACE="eth0"

In the "DHCP_INTERFACE" label should specify the interfaces that will be used to provide the service.


The configuration file "dhcpd.conf"


The DHCP is basically divided into two sections. The first is the general options and are global. The second and last define the network segment where the DHCP will reside. There may be more than one section of this type. The parameters here writings are more global preference.


authoritative;

This statement allows you to define the DHCP server is authoritative for the defined network segment and can send warning messages to misconfigured clients.


default-lease-time 21600;

This standard defines how many seconds will "rent" an IP address to a computer that request before it has to request an extension


max-lease-time 43200;

Defines the maximum time that a device can retain an IP number assigned by the DHCP server without applying for it an extension (max-lease-time).


ddns-update-style none;

This parameter controls whether the server will attempt, or not, make a DNS update when a loan is confirmed.


subnet ……… netmask ………

Defines a network with subnet mask


range

Select the address range used by the DHCP daemon to assign IP addresses to clients who consult. For this example, are all the addresses between 172.16.3.2 and 172.16.3.10


option domain-name-servers dns1.intranet.labtest;

Enter up to three DNS servers. These are responsible for resolving IP addresses to hostnames (and vice versa).


option domain-name "intranet.labtest";

Defines the default domain of your network


option routers 172.16.3.1;

Defines where to be sent data packets that can not be delivered to the local network (due to the direction of the source host and the destination host and the subnet mask). This router usually acts as the gateway to the Internet for small networks.


option subset-mask 255.255.255.0;

Provides customer network mask to deliver.


Below is an example configuration file: /etc/dhcpd.conf

linux# vi /etc/dhcpd.conf

#
# Section Global parameters
#

authoritative;
default-lease-time 21600;
max-lease-time 43200;
ddns-update-style none;

#
# Section Network Configuration
#

subnet 172.16.3.0 netmask 255.255.255.0 {
 range 172.16.3.2 172.16.3.16;
 option domain-name-servers dns1.intranet.labtest;
 option domain-name "intranet.labtest";
 option routers 172.16.3.1;
 option subset-mask 255.255.255.0;
}

After this brief setup, you should be able to activate the DHCP daemon with the command rcdhcpd start or /etc/init.d/dhcpd start

It is also possible to control the syntax of the configuration using the "rcdhcpd check-syntax" command. If there is a problem and the server gives an error check with "tail-f /var/log/messages".

Read more

Configuring a NTP Time Server

The NTP or Network Time Protocol, is an Internet protocol used to synchronize the clocks of network equipment, important when performing safety analysis, the importance of clock synchronization.

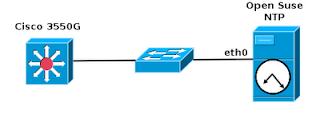
NTP Server for Cisco 3550G

The NTP uses UDP as a transport, using port 123. NTP uses a hierarchical system of strata clock, which starts with the stratum 1, these are the first-level devices are usually synchronized with external clocks such as GPS or an atomic clock. The stratum 2 devices are devices that take or synchronize their time from one or more stratum 1 systems, and so on.

The following manual describes the configuration of NTP service running on a server with Open Suse 11.4 and synchronization with a Layer 3 switch, Cisco 3550G.

NTP Server Configuration in Suse Linux.

Distribution: SUSE-11.4 (pakage need xntp)
Server IP address 172.16.2.2

For configuration is necessary to edit the /etc/ntp.conf

server 127.127.1.0
fudge 127.127.1.0 stratum 10

server 0.pool.ntp.org
server 1.pool.ntp.org
server clock.via.net

deiftfile /var/lib/ntp/drift/ntp.drift
logfile /var/log/ntp

Once these changes have to restart the NTP daemon

linux:~ # /etc/init.d/ntp start
Starting network time protocol daemon (NTPD) done
linux:~ # chkconfig ntp on

NTP client configuration in Cisco 3550G switch

switch# configure terminal
switch(config)# ntp server 172.16.2.2

Verifying the configuration

switch# show running-config
ntp clock-period 17180614
ntp server 172.16.2.2

In this way it is possible to synchronize the network switching equipment with an NTP server in a simple way, it is also important to synchronize the network and application servers with time servers. This is very important when making any type of monitoring equipment.

Note: For more information about the use, operation and ntp server list visit http://ntp.isc.org/bin/view/Servers/WebHome

Read more

Linux DHCP server for multiple VLANs

The Dynamic Host Configuration Protocol server, DHCP is a protocol that allows individual devices on a network to get their own network configuration information such as IP address, subnet mask, gateway, DNS servers, etc. . The main purpose is to make it easier to manage large networks.

Without the help of a DHCP server would have to manually set each IP address of each computer on the network. A DHCP server monitors and distributes IP addresses in a local area network by assigning an IP address to each computer that is attached to the Local Area Network.

There are three methods of assignment in the DHCP protocol: Manual assignment, automatic assignment and dynamic assignment. In the following example, we analyze two of these cases.

This document explains in simple terms how to configure a Linux server to assign addresses via DHCP to multiple vlans.

VLAN_DHCP_Linux

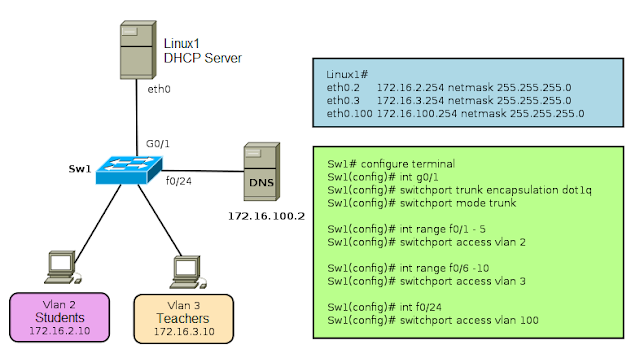
For the example of the graph, it is considered that a server is configured Linux1 routing packets, that is configured as a router, as well as function as a DHCP server.

In small or medium networks can use the same equipment as DHCP server and as a router, however when the network grows, it is advisable to separate these functions, on different devices. Always remember that the switch port where the DHCP server is connected must be configured as Trunk (IEEE 802.1Q).

In the example also sees a DNS server, it may be a server configured in Linux or Windows, this server belongs to vlan 100 and have configured the IP address 172.16.100.2


VLAN2 Network Data

IP Number VLAN2 network: 172.16.2.0
Subnet Mask: 255.255.255.0
Gateway: 172.16.2.254 (IP Address Interface VLAN2 on the server)
Name Server: 172.16.100.2

VLAN3 Network Data

IP Number VLAN3 network: 172.16.3.0
Subnet Mask: 255.255.255.0
Gateway: 172.16.3.254 (Interface IP Address VLAN3 on the server)
Name Server: 172.16.100.2


Configuration File /etc/dhcpd.conf

# Configuration for the network 172.16.3.0/24
# The 172.16.3.0 network will be configured statically,
# ie always assigned the same IP address to computers.
# ------------------------------------------------------

subnet 172.16.3.0 netmask 255.255.255.0
{
option subnet-mask 255.255.255.0;
option broadcast-address 172.16.3.255;
option domain-name "test.com";
option domain-name-servers 172.16.100.2
option routers 172.16.3.254;

# IP allocation to each PC

host pc01
{
option host-name "pc01.test.com";
hardware ethernet 00:06:AB:AB:01:01;
fixed-address 172.16.3.1;
}

host pc02
{
hardware ethernet 00:06:AB:AB:02:02;
fixed-address 172.16.3.2;
}
}

# Settings for network 172.16.2.0/24

# Network data vlan2 dynamically allocated
subnet 172.16.2.0 netmask 255.255.255.0
{
range 172.16.2.10 172.16.2.20;
option subnet-mask 255.2255.255.0;
option broadcast-address 172.16.2.255;
option domain-name "test.com";
option domain-name-servers 172.16.100.2;
option routers 172.16.2.254;
}

Configuring network interfaces where DHCP service work

A good safety measure is to make the dhcpd service only works through the network interface used by the LAN, that in the case of multiple network devices.

Edit the file /etc/sysconfig/dhcpd and add as parameter argument value DHCPDARGS eth0, eth1, eth2, or in our case eth0.2, eth0.3.

# Command line options here

DHCPDARGS=eth0.2, eth0.3

Note: For example, do not add the interface eth0.100 because normally address assignment on the servers is not done via DHCP.

Then just start the service is dhcp.

/sbin/service dhcpd start or in the case of opensuse /etc/init.d/dhcpd start

Read more

Installing Cacti server (Linux server cacti)

Cacti is an open source tool that allows a network administrator to know the link status, availability of network devices, among other things. This knowledge is important because it allows you to plan, book and manage efficiently the resources of a LAN.
Logo Cacti

Requirements:
  • Distribution: Kubuntu 9.04
  • Software: cacti (hobbit-4.2.0.tar.gz), apache2 (apache2.2.9)
  • Server: netadmin (IP-Addr: 192.168.1.5)

Cacti Server Dependencies

Cacti requires that the following packages are installed on your system.
  • RRDTool 1.0.49 or 1.2.x or greater
  • MySQL 4.1.x or 5.x or greater
  • PHP 4.3.6 or greater, 5.x is recommended
  • Web Server, Apache2 for this manual.

Name required packages
  • httpd
  • php
  • php-mysql
  • php-snmp
  • mysql
  • mysql-server
  • net-snmp

Installing Cacti program

netadmin @linux:~ > apt-get install cacti

Note: During this process, it will install all dependencies that cacti need. (Only debian based operating systems). In Kubuntu, Cacti for a password for the database during this process. So no need to perform subsequent configurations.

Cacti Server Basic Configuration

Once completed the installation process of packages, we proceed to the configuration is done through a web browser.
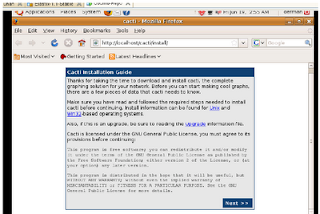
Configure Cacti

As this is a new installation, you only need to click on next.
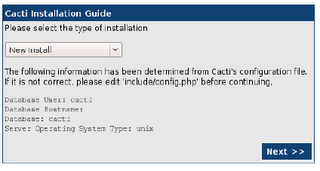
Configure Cacti page 2


This section asks the user key administrator for the first time, the User Name is "admin" and password: "admin". Cacti, then request the change of the password for the admin user
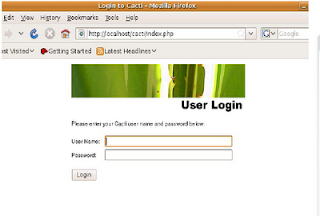
Configure Cacti - username

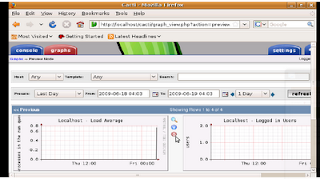
By default, the first time Cacti allows access to the admin account with admin password, then you make this change, you can view images of the home team. Cacti can monitor only the local computer, then you have to configure the control of other computers.
Configure Cacti - admin

Add a new device

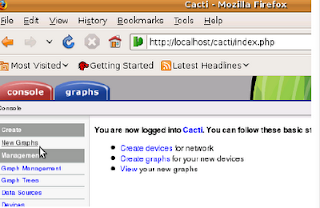
To add a new device (servers, switches or routers) must enter the Console tab and then select the item New Graph.
Configure Cacti - add device

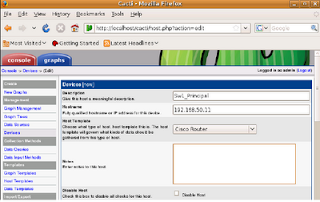
This section introduces the details of equipment, such as IP address, device description (important to identify it) and type of device.
Configure Cacti - detail new device
Configure Cacti - detail new device part 2

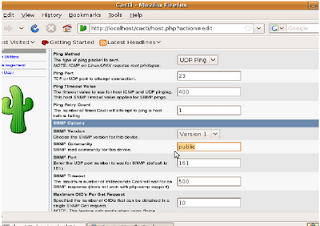
This is a continuation of the previous screen is used to configure the communication mechanism of Cacti with the device, either through ping or snmp, snmp is best done by, and is also recommended to configure an SNMP community other than public


Creating new graphics on the device
Configure Cacti - new graphics

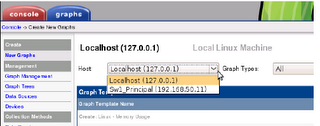
To add a chart to an existing device, you must enter the Console tab and then select the item New Graph.
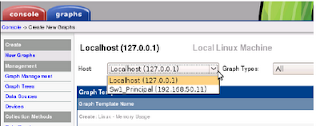
Configure Cacti - new chart

At this stage, Cacti, equipment selection requests which to generate the new graph
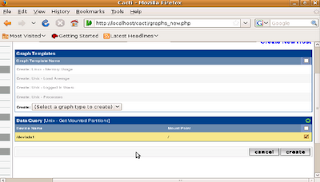
Configure Cacti - generate new graph

As shown, it is only necessary to perform a check on the new graph needs to be created.

Once you do this, the process is the same for adding new switches and routers. Cacti also allows many other options, however, this will allow you to start working with a very good system to control the bandwidth being used on the network.

Read more

Hobbit Server Configuration (Network Monitoring)

Hobbit service

Activation Process for Agent Hobbit (hobbit Linux server)

Distribution : Kubuntu 9.04
Software : hobbit (hobbit-4.2.0) , apache2 (apache2.2.9)
Servidor : Netadmin (IP-Addr:192.168.1.5)


Add hobbit user

linux:~ # groupadd hobbit
linux:~ # useradd –d /usr/local/hobbit –g hobbit hobbit
linux:~ # mkdir /usr/local/hobbit/
linux:~ # chown hobbit.hobbit /usr/local/hobbit


Hobbit installation program

hobbit@linux:~ > apt-get update
hobbit@linux:~ > apt-get install apache2
hobbit@linux:~ > apt-get install hobbit

During this process, all units installed Hobbit needs. (Only in Debian-based operating systems)


Hobbit Service Configuration

You need to setup the hobbit master file (in this file are input devices that will monitor Hobbit) (command vi /etc/hobbit/bb-hosts)

page Servers(internal) Servers(Private)

group-compress Servers(Private)

# ----------- Servers Main Building -------------

192.168.0.2 Web # NET:intern http://192.168.0.2/

192.168.0.3 DNS #

192.168.0.4 Moodle # NET:intern http://192.168.0.4/

192.168.0.5 Plone #

127.0.0.1 Local-Device # bbd http://Netadmin-desktop/

page Switches(internal) Switches(Netadmin)

group-compress Switches(Netadmin)

# ------------------------------------------------------

# -----------Switches Main Building ---------------

# 192.168.50.10 Sw1.Main #

192.168.50.11 Sw2.Main #

192.168.50.12 Sw3.Main #

##

-----------Switches Central Building ----------------

# 192.168.50.20 Sw1.Central #

192.168.50.21 Sw2.Central #

##

-----------Switches South Building----------------

# 192.168.50.30 Sw1.South #

192.168.50.31 Sw2.South #

# ------------------------------------------------------


Changing Apache2

Modify the /etc/apache2/hobbit/httpd.conf (Archive with web access policies)

Alias /hobbit/ "/usr/local/hobbit/server/www/"

Options Indexes FollowSymLinks Includes MultiViews

Order allow,deny

Allow from all

ScriptAlias /hobbit-cgi/ "/usr/local/hobbit/cgi-bin/"

AllowOverride None

Options ExecCGI Includes

Order allow,deny

Allow from all

ScriptAlias /hobbit-seccgi/ "/usr/local/hobbit/cgi-secure/"

AllowOverride None

Options ExecCGI Includes

Order allow,deny

Allow from all

AuthUserFile /usr/local/hobbit/server/etc/hobbitpasswd

AuthGroupFile /usr/local/hobbit/server/etc/hobbitgroups

AuthType Basic

AuthName "Hobbit Administration"

Require valid-user


Automatic start of Hobit

linux:~ # cp /usr/local/hobbit/server/hobbit.sh /etc/init.d/hobbit

linux:~ # chkconfig hobbit on


Setting admin password

Linux:~# /usr/sbin/htpasswd –c

/usr/local/hobbit/server/etc/hobbitpasswd admin

New password:

Re-type new password:

Adding password for user admin

linux:~ #


Restart Apache2 service

linux:~ # /etc/init.d/apache2 restart

Syntax OK

Shutting down httpd2 (waiting for all children to terminate)

done

Starting httpd2 (prefork) done


Restart Hobbit service

linux:~ # /etc/init.d/hobbit start

Starting hobbit: Hobbit started

hobbit.

linux:~ #


Check the operation

To verify the service via a web browser.
  • http://192.168.1.5/hobbit/

Read more

Enabling the SNMP Agent for Linux SUSE

Requirements

Before beginning to describe the steps to perform an SNMP agent configuration is necessary to verify that they meet the following requirements.
  • Suse Linux
  • net-snmp version 5.2 or more recent.
Note: to install snmp package, use the installation source or method it deems appropriate, rpm, tar or using yast.

Configuration

Edit the snmpd.conf file located in the /etc/snmp/ directory or can be found in the /etc/ directory.

syslocation Server Room
syscontact Sysadmin (root@localhost)
rocommunity public 127.0.0.1
#com2sec
com2sec local localhost private
com2sec mynetwork 192.168.1.1/24public
#group
group local_group v1 local
group local_group v2c local
group local_group usm local
group public_group v1 mynetwork
group public_group v2c mynetwork
group public_group usm mynetwork
view all included .1 80
access local_group "" any noauth exact all none none
access public_group "" any noauth exact all none none

Activating Agent

linux:~# /etc/init.d/snmpd start
Starting snmpd

linux:~# chkconfig snmpd on

Note: Once you have completed these steps, the SNMP agent will be ready to go, and starts automatically when you turn on the server.

Activation of the port in the firewall:

Enable ports UDP 161 and TCP 161.

If you are using the iptable is necessary to introduce a line like this in the file: /etc/init.d/boot.local.

iptables -A INPUT -s 192.168.1.1 -p tcp --dport 161 -j ACCEPT

Note: The address 192.168.1.1 is the server that will be making monitoring Internet traffic to each of the branches of the company or institution that is why you must allow port 161 access to this computer.

Read more

How to setup DNS server on Cisco routers

In environments of large networks is recommended to setup the router to use DNS to resolve computer names. Cisco routers enabled their default name resolution via DNS, but have not setup DNS server address used as the broadcast address (255.255.255.255) until you setup the DNS server address.

Router1#configure terminal
Enter configuration commands, one per line.  End with CNTL/Z.
Router1(config)#ip domain-name test.com
Router1(config)#ip name-server 172.16.1.10
Router1(config)#ip name-server 10.1.20.51
Router1(config)#end
Router1#

Subsequently, these commands can be accessed from the router to any computer through its name, if DNS servers do their jobs well.

For example, in case you want to do a simple test to www.yahoo.com:

Router1#ping www.yahoo.com
Translating "www.yahoo.com"...domain server (172.16.1.10) [OK]
Type escape sequence to abort.
Sending 5, 100-byte ICMP Echos to 67.195.160.76, timeout is 2 seconds:
!!!!!
Success rate is 100 percent (5/5), round-trip min/avg/max = 80/91/104 ms
Router1#

The following command line is possible to identify the router sends a request to 172.16.1.10 DNS server and asks it to translate the name www.yahoo.com. The server responds with the IP address and then the ping will be held as usual.

The router will consult with both servers in order to make decisions. So that if the first server is not able to answer the request, then sends the request to the second server if the second server can not resolve the request, then the request fails:

Router1#ping tos.com
Translating "toos.com"...domain server (172.16.1.10)(10.1.20.51)
% Unrecognized host or address, or protocol not running.
Router1#

For the information of the configured DNS servers, you can use the show hosts command:

Router1#show hosts
Default domain is test.com
Name/address lookup uses domain service
Name servers are 172.16.1.10, 10.1.20.51

Host                        Port       Flags      Age Type     Address(es)
www.yahoo.com    None  (temp, OK)    0     IP     67.195.160.76
Router1#

The above command not only shows the DNS servers configured, also shows the domain name and DNS entries recently translated. The team names caches have been resolved recently. There is a difference between the domain names that the team learns the names dynamically and statically configured. The statically defined names are not deleted from the cache, while the dynamically learned are deleted after a certain period of time.

Defining a domain name on the router not only helps the team know your domain name, but also facilitates obtaining the domain names of the teams that are on your subnet, for example:

Router1(config)#ip domain-name test.com

In doing so, you can use a classification such as ftp to reference the domain name server ftp.test.com. For organizations that use or possess more than one domain name, it is recommended to enter all names in the router:

Router1#configure terminal
Enter configuration commands, one per line.  End with CNTL/Z.
Router1(config)#ip domain-list test.com
Router1(config)#ip domain-list test2.com
Router1(config)#end
Router1#

Read more

How to setup HTTP Server on Cisco routers

Cisco includes an HTTP server in each router or switch, in the IOS. Some network administrators use this feature on the router to manage it remotely from any web browser instead of using Telnet to access the computer.

How to setup HTTP Server on Cisco Routers? Is as follows:

Router1#configure terminal
Enter configuration commands, one per line.  End with CNTL/Z.
Router1(config)#access-list 75 permit 172.16.1.10
Router1(config)#access-list 75 deny any
Router1(config)#ip http server
Router1(config)#ip http access-class 75
Router1(config)#end
Router1#

After configuring the HTTP server on the router you can access it from any web browser. In the above example, you can identify that you are allowing access to the router only from a computer IP address 172.16.2.10 due to the configuration of the access control list.

This option is available in the IOS from Version 11.2. However, according to some experts believe that the official version there were many security problems have been fixed in version 12.1 (5). It is not advisable to use the web server option in previous versions.

As security measures to this problem, we recommend a list of access control to ensure that only you can access from a well known team. The following lines explain that only you can access from the IP address 172.16.1.10 and then applied through the command ip http access-class.

Router1(config)#access-list 75 permit 172.16.1.10
Router1(config)#access-list 75 deny any
Router1(config)#ip http access-class 75

Although set up access via the web is not so complicated, it is easier to access through a command line. It is not recommended to use this access to the router.

Read more

How to use a Cisco router as a tftp server

How to use a Cisco router as a tftp server

In some cases you can use a router to perform the functions of a tftp server, but it is necessary to take into account the functions performed by the computer and only use these tools or facilities where necessary.

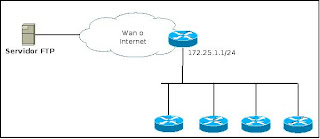
One case where you can use this function when you need to update multiple routers via a slow link WAN or Internet as in a branch or remote site

Cisco Router as TFTP Server
Use a Cisco router as a tftp server

In situations like this, it is possible to upgrade from a remote computers and then set it as TFTP server to upgrade the rest, so it is optimizing the use of slow network links. The necessary commands are:

Router1#configure terminal
Enter configuration commands, one per line.  End with CNTL/Z.
Router1(config)#tftp-server flash:c2600-ik9o3s-mz.122-12a.bin
Router1(config)#end
Router1#

It is important to know that this router a tftp server is not 100% functional, ie only works for file downloads, you can not use it to upload files. However, it is possible to use the tftp server to load than the IOS files and download files to non-cisco. It is also important to be aware that enable a new service like tftp involves security issues that could be exploited by an attacker.

Some authors recommend not to use tftp in routers, especially on computers that are connected to public networks, however you can use an access control list to prevent problems that jeopardize the security of the network.

Access control list used for the previous figure.

Router1#configure terminal
Enter configuration commands, one per line.  End with CNTL/Z.
Router1(config)#access-list 50 permit 172.25.1.0 0.0.0.255
Router1(config)#access-list 50 deny any
Router1(config)#tftp-server flash:c2600-ik9o3s-mz.122-12a.bin  50
Router1(config)#end
Router1#

This simple access control list allows all devices are on the 172.25.1.0/24 network to access the tftp server. As you can see, it is necessary to indicate the number of the access control list at the end of the tftp-server command. If you want to share more than one file from the server, you need to add more lines to the command tftp-server

As a special recommendation, it is suggested to activate this service for necessary, ie to complete the process of renovation is recommended to disable the service.

Read more